Frequently Asked Questions
- To avoid the chargeable fees, Vendor is strongly advised to not upgrade their account.
- Should Vendor upgraded to Enterprise Account (EACC), Vendor is strongly encouraged to self-convert for downgrade to Standard Account (SACC) the soonest possible.
- If the account is locked, Vendor can either perform one of the following action items: 3.1. Clear the fees, login and perform account self-downgrade.
3.2. Unlink their current business network account and re-register with another account. Then Vendor must communicate with respective Departments (PO issuer) to close the PO and issue new PO to the Vendor's new ERP Vendor ID.
- Login to GVP (supplier.ariba.com) with their existing account..
- Please ensure that the Vendor is at Ariba Business Network screen (look at top-left of the screen, select Ariba Business Network via the arrow dropdown if necessary).
- Click on the user profile (user initials) in the upper-right corner of the
screen. Refer to figure 1.
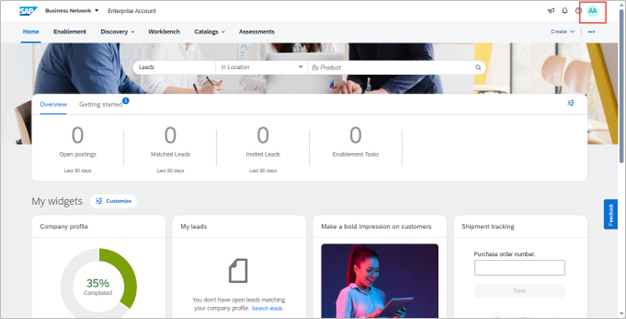
Figure 1
- Click on Convert to Standard Account button. Refer to figure 2.
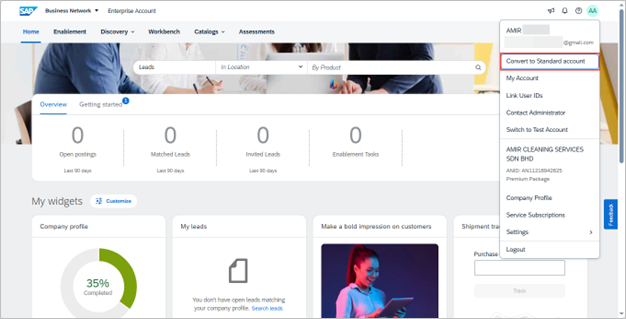
Figure 2
- Click on Check Eligibility Status button. When all eligibility criterias are
met, the Convert now button will be displayed and Vendor can proceed to convert
their account. Refer to figure 3.
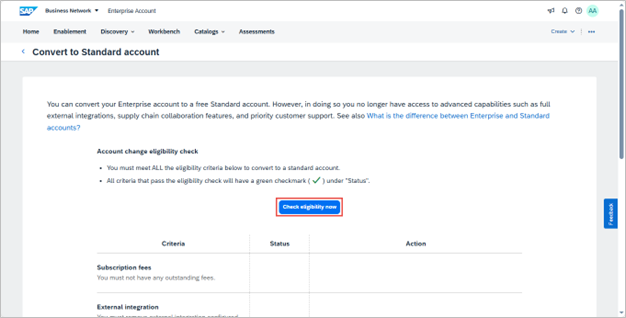
Figure 3
- Click on Convert now button. This would result in a message pop-up. Refer to
figure 4.
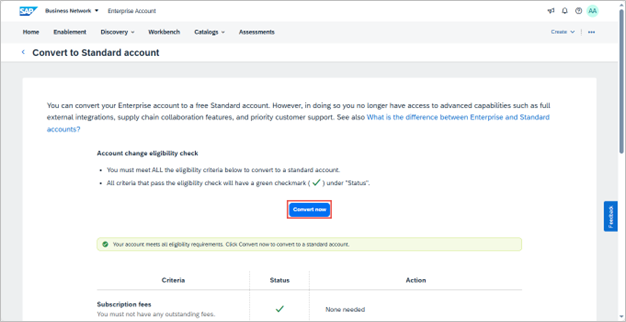
Figure 4
- Click on Convert now button. Refer to figure 5.
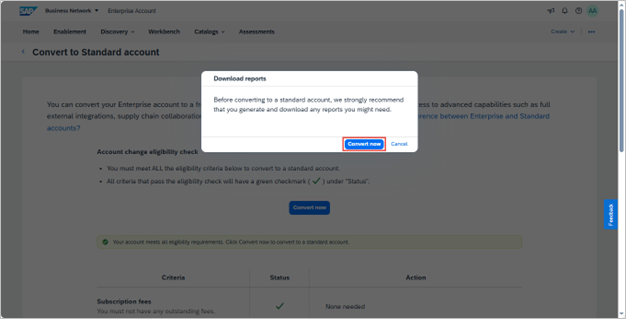
Figure 5
- For successful account conversion to Standard Account, a pop-up message will
be displayed. Refer to figure 6.
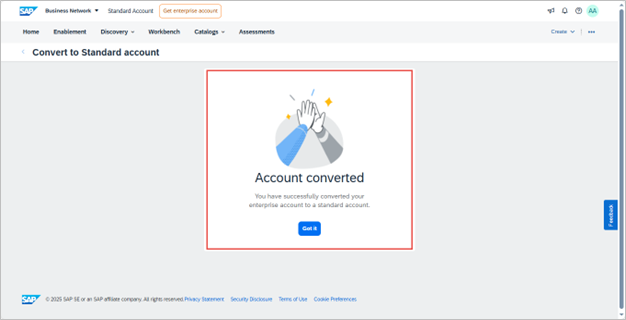
Figure 6
- Department must inform the Vendor that Goods Received (GR) had been cancelled..
- Vendor can submit a complete Advanced Shipping Notice (ASN) instead of partial ASN once Department cancelled the GR. This means, the remaining line-items or quantity are submitted.
- Department and Vendor are strongly encouraged to communicate when ASN and/or GR have been completed accordingly.
- The Advanced Ship Notice (ASN) can not be deleted by Vendor.
- Meanwhile, only the Department can reject and delete the Goods Received (GR), or when Purchase Order (PO) is to be closed.
- This can be resolved by using stable internet connection.
- Should the issue persists, it recommended to use another internet browser. i.e. If vendor is using Google Chrome, they may use either Microsoft Edge or Mozilla Firefox to access their GVP account.
- Vendor can view their registration status under Supplier Registration Questionnaire section via Ariba Proposals and Questionnaires. Once the submitted registration questionnaire is approved by MOFE, Vendor's registration status will change from 'Pending Approval' to 'Registered'.
- Should any information provided are queried, Vendor will be notified upon login on the queries for the submitted registration questionnaire and Vendor is required to resubmit (revise response) with accurate and up-to-date details.
Process Flow A: To view Vendor's registration status from Vendor perspective
- Vendor login to GVP (supplier.ariba.com).
- Vendor change dashboard via dropdown on the top left of the screen from 'Business Network' to 'Ariba Proposals and Questionnaires'.
- Vendor scroll down the page to Supplier Registration Questionnaire section.
- Vendor can view the registration status for the submitted questionnaire i.e. Pending Approval means pending approval by MOFE while Registered means registration approved by MOFE.
- Vendor information (Queries - Description):
- Type of Business - Select one or more that best describes the type(s) of your business.
- Product / Service Categories - Users can add or browse (search) for an overview of their product or service. Users can refer to their ROC business extract (commodity) and select the most relevant product or service from the list. For example, financial services, office suppliers, taxation law, construction, and etc.
- Nature of Business - Select one or more that best describes the nature(s) of your business.
- Certificates - Vendors may enter the relevant certificate details (if applicable) and attach supporting documentation such as Halal Certificate, ABCi / Construction-related Certificate, Training (Learning) Certificate, and ISO Certificates.
-
Vendor Bank Details (Queries - Description):
- Bank Name
Name of the bank used for operation should be stated in full using capital letters only. For example, BANK ISLAM BRUNEI DARUSSALAM or BAIDURI BANK BRUNEI or STANDARD CHARTERED. - Bank Key
It is a mandatory, unique key in capital letters only for both local and overseas bank.
- Bank Name
- Mainly applicable for Vendors that were invited in Mar-Apr 2024 and re-invited in Jun 2024 where the Vendors who are required to take next action did not click on the link emailed to them. Also, this scenario may occur to those Vendors with incorrect email address in T1.
- Vendor can email request to TAFIS PPP (tafis.ppp@mofe.gov.bn) for GVP registration email.
- MOFE Ariba Approver to change the primary contact and resend invitation link for GVP registration.
- Moving forward, both local and overseas vendors would be required to self-register via TAFIS website (tafis.gov.bn). Invitation link will not be re-sent by MOFE team.
- Login to GVP (supplier.ariba.com) with their existing account.
- Please ensure that the Vendor is at Ariba Business Network screen (look at top-left of the screen, select Ariba Business Network via the arrow dropdown if necessary).
- Click on the user profile (user initials) in the upper-right corner of the screen.
- Click on My Account.
- Edit / amend / update the relevant field. e.g. Username and Email Address.
- Click on Save button.
- Vendor can access GVP website (https://www.tafis.gov.bn/reference.html) under Bank Key List page. The file consists of Bank Keys from all banks from various countries that are registered in TAFIS 2.0.
- During Supplier Self-Registration, the Vendor can access the Bank Key List page by clicking on the dedicated link. Refer to figure 1.

Figure 1
- All Vendors (local and overseas) are required to self-register via the Supplier Self-Registration link (http://mofe.sourcing3.ariba.com/ad/selfRegistration). Refer to figure 1.
- Vendor can access the guides that outlines the steps in GVP website (https://www.tafis.gov.bn/reference.html) on Supplier Registration and Information Update.
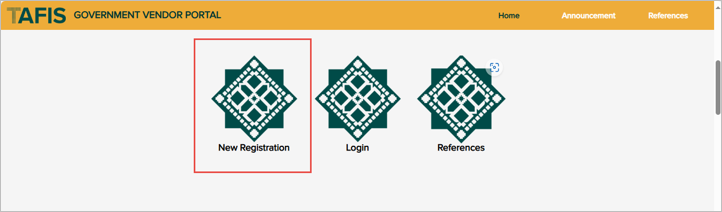
Figure 1
- Go to GVP login page at supplier.ariba.com via any Internet browser.
- Click on Forgot Username. Refer to figure 1.
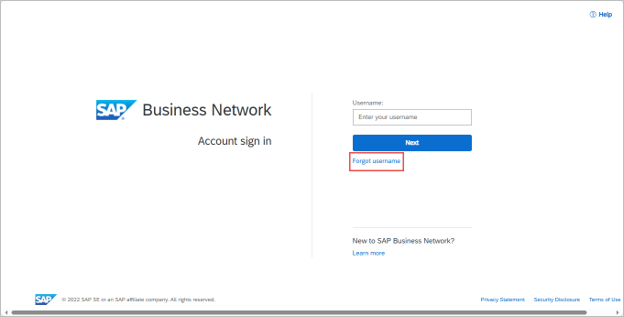
Figure 1
- Under Email address field, Vendor must enter the email address you used to
register with SAP Business Network and click on Submit button. Refer to figure
2.
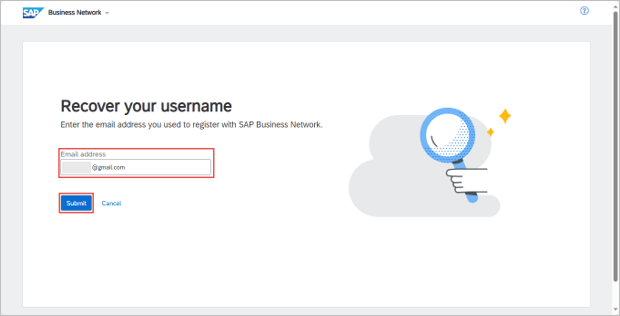
Figure 2
- A notification pop up will be displayed to inform that Vendor will receive an
email. Refer to figure 3.
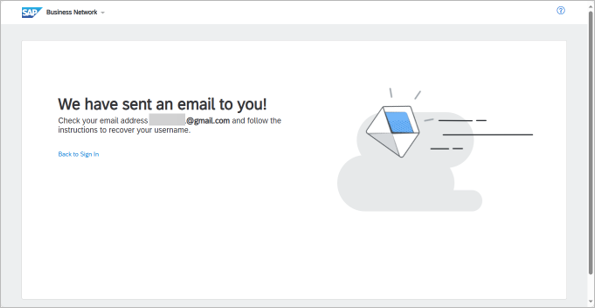
Figure 3
- Vendor will receive an email from SAP Ariba Commerce Cloud containing their
account Username for retrieval. Refer to figure 4.
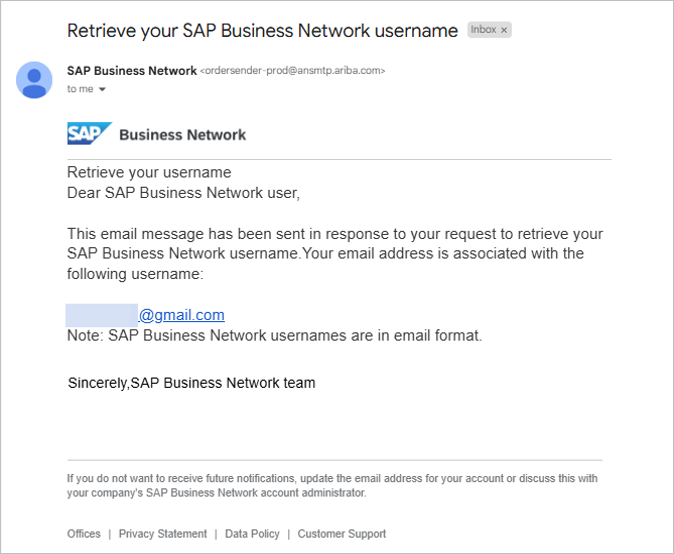
Figure 4
- Go to GVP login page at supplier.ariba.com via any Internet browser.
- Vendor enter their account Username (Login email address) and click on Next
button. Refer to figure 1.
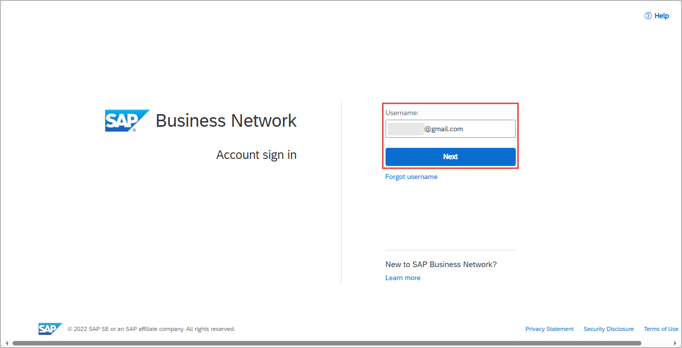
Figure 1
- Click on Forgot Password. Refer to figure 2.

Figure 2
- Under Reset your password field, Vendor must enter the email address you used
to register with SAP Business Network. Then click on Submit button. Refer to
figure 3.
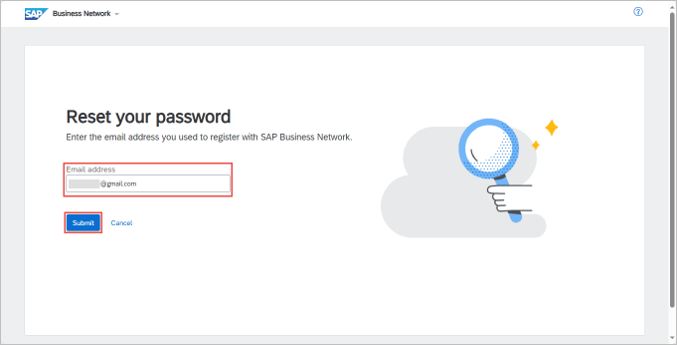
Figure 3
- A notification pop up will be displayed to inform that Vendor will receive an
email. Refer to figure 4.
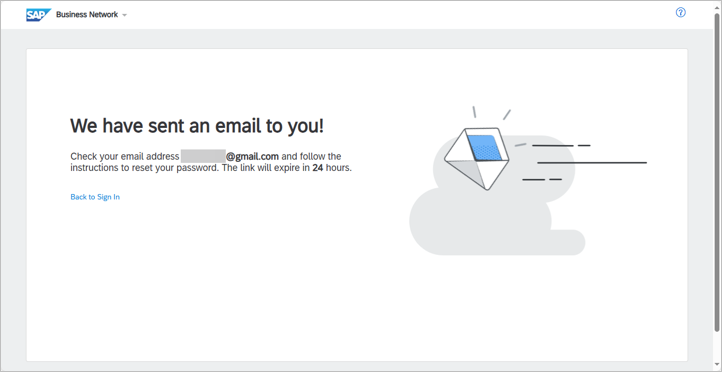
Figure 4
- Vendor will receive an email from SAP Ariba Commerce Cloud with a link to
reset their password, which will expire within 24 hours. Refer to figure 5.
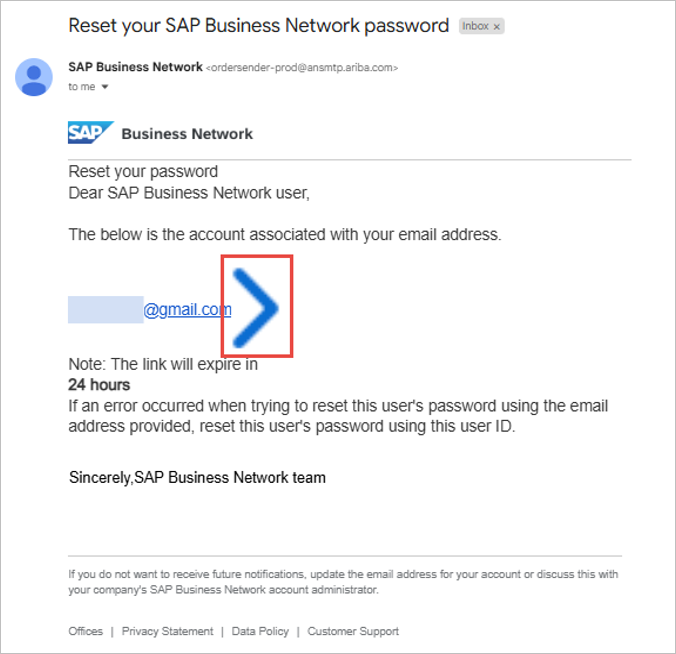
Figure 5
- Vendor will be directed to Reset your password page.
- Enter New password and Confirm your password fields. Then click on Submit
button. Refer to figure 6.
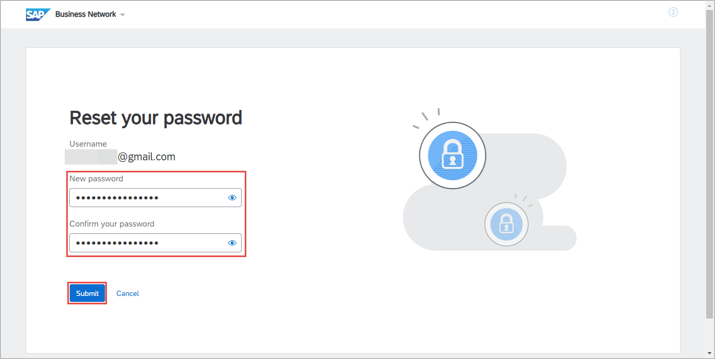
Figure 6
- Vendor's account password will be updated.
- Vendor can only view the Orders tab in their GVP dashboard once they performed a one-time setting to establish Trading Relationship. Establish of Trading Relationship (ETR) is conducted when Vendor receives their first Purchase Order (PO) in GVP.
- Vendor must ensure the Department had issued an approved Purchase Order (PO) to the correct vendor.
- Vendor must view the email notification received from GVP which informs the vendor a PO has been issued.
- ETR can be conducted by clicking on 'Process Order' button in the email received by vendor. This will link the Vendor's account in GVP to TAFIS 2.0.
- Vendor can view the Purchase Order (PO) issued by Department in their Orders tab from GVP dashboard.
- Establish Trading Relationship (one-time setting) for PO to be visible for Vendors.
- Department and Vendor are strongly encouraged to communicate when a Purchase Order (PO) have been issued as well as received accordingly.
- Any Purchase Orders (PO) issued by Department to Vendors will be sent via email and will be accessible in vendor’s GVP dashboard. These POs can be processed. i.e. confirm order (CON), ship notice (ASN), service sheet (SES) and invoice.
- Vendor can only view the Orders tab in their GVP dashboard once they performed a one-time setting to establish Trading Relationship. Establish of Trading Relationship (ETR) is conducted when vendor receives their first Purchase Order (PO) in GVP.
- Vendor must ensure the Department had issued an approved Purchase Order (PO) to the correct vendor.
- Vendor must view the email notification received from GVP which informs the vendor a PO has been issued.
- ETR can be conducted by clicking on 'Process Order' button in the email received by vendor. This will link the vendor's business / supplier account in GVP to TAFIS 2.0.
- Only after trading relationship has been established, the vendor can view the issued PO and process it accordingly.
- Vendors are strongly encouraged to check prior confirming the Purchase Order (PO) whether correct button is visible and correct PO nature or type based on the category for the line-items.
- Vendor can view the PO issued by department in their Orders tab from GVP
dashboard.
- For Materials (Goods) PO, the Create Ship Notice button should be visible
and greyed out before confirmation (refer to figure 1) and the category for
the line-items is 'Material' (refer to figure 2).
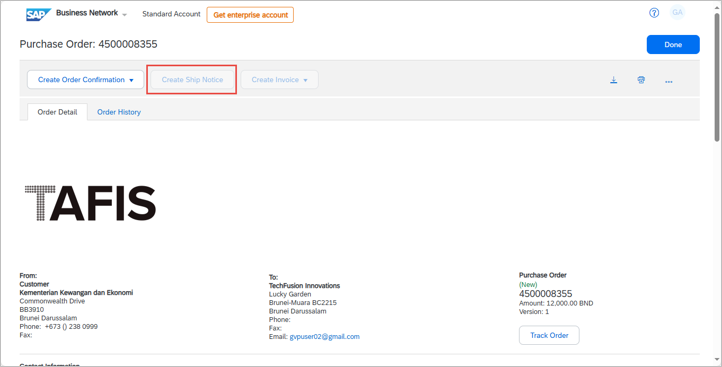
Figure 1
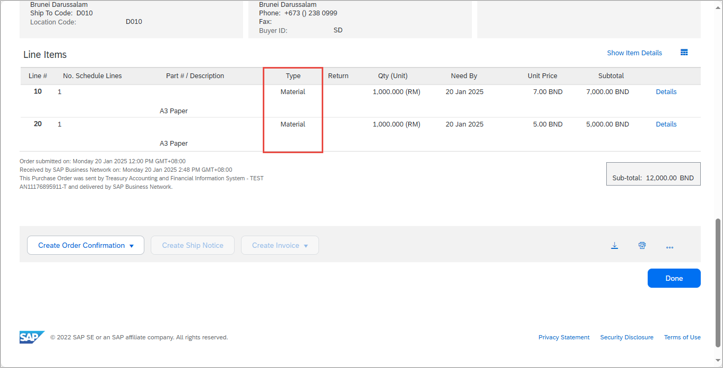
Figure 2
- For Services PO, the Create Service Sheet button should be visible and
greyed out before confirmation (refer to figure 3) and the category for the
line-items is 'Service' (refer to figure 4).

Figure 3

Figure 4
- For Materials (Goods) PO, the Create Ship Notice button should be visible
and greyed out before confirmation (refer to figure 1) and the category for
the line-items is 'Material' (refer to figure 2).
- Should the PO is incorrect, Vendor must inform the respective Department to close the PO and reissue accordingly.
- The vendors may receive Purchase Orders (POs) for Services with lump sum (whole) amount. In this type of PO, the values under Quantity and Amount (Unit Price) columns/fields are swapped. In general, this PO type is used since there is no fixed price.
- The lump sum Service POs would not have more than one line item or any further breakdowns which means vendors can only claim for payment (submit invoice) based on the completed services from Service Entry Sheet (SES) in Government Vendor Portal (GVP).
- SES submission is to gain acknowledgement and acceptance from the Department of the services that had been completed.
- In this case, since not all services have been completed by the vendor, they are expected to submit ‘Partial SES’ in GVP
- Once the Department acknowledges and accepts the ‘Partial SES’ in the system, the vendor can proceed to submit an invoice In GVP.
- Since not all services have been completed, the vendor can only submit invoice to claim a portion of the whole amount according to the completed services i.e. based on approved Partial SES. Thus, the term, Partial Invoice (partial claims) is used.
Example: A lump sum service PO has been issued for security guard services from Vendor XY with duration of 12 months and the total amount is BND12,000. However, there is no specific rates or amount allocated for each month. Although, Department and vendor had an agreement that the payment would be based on duty attendance of security guards for each day per month.
In July, Vendor XY submits partial SES and partial invoice of BND1,000 in GVP since all allocated security guards attended daily that month. Meanwhile, in August, the amount may differ (e.g. BND825 only) if there are absentees which would reduce the amount for SES and invoice to the Department.
- Vendor can select the completed services (line items) in 'Create Service Sheet' page in GVP by clicking on the Toggle button under Include column at Service Entry Sheet Lines section. This allows Vendor to submit separate or multiple service entry sheets depending on the service completion.
- Toggle button is used to select (include) and deselect (exclude) services or line items for the service sheet.
- Colour of toggle button can be used as quick reference whether the line item is selected or deselected. i.e. Blue Toggle button means included for service sheet while Greyed out Toggle button means excluded for service sheet. Refer to Figure 1.
- Prior to submission, Vendor must confirm the correct line item or services are selected along with the subtotal amount. Refer to Figure 2.
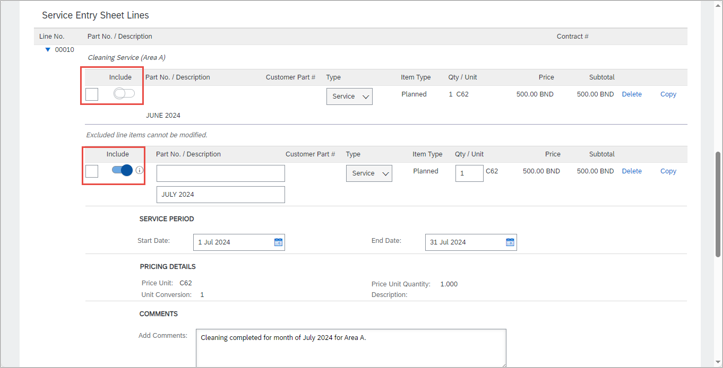
Figure 1
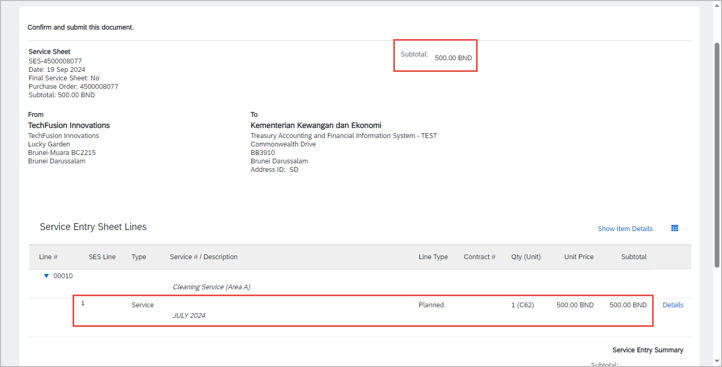
Figure 2
- Department must inform the Vendor that Service Entry Sheet (SES) had been revoked or deleted.
- Vendor to cancel the SES via GVP.
- Vendor to submit a complete SES once the previous SES has been cancelled.
- Department and Vendor are strongly encouraged to communicate when SES submission and acceptance have been completed accordingly.
- This applies for the following scenarios:
- Service Entry Sheet (SES) submitted with incorrect details such as incorrect quantity, selection of line items, amount and Purchase Order (PO) type.
- PO is to be closed for respective reasons.
- Department revoked their acceptance or deleted the submitted SES and requires Vendor to submit a new SES.
- Login to GVP (supplier.ariba.com) with their existing account.
- Find and open the PO.
- Click on the SES document under Related Document. Refer to figure 1.
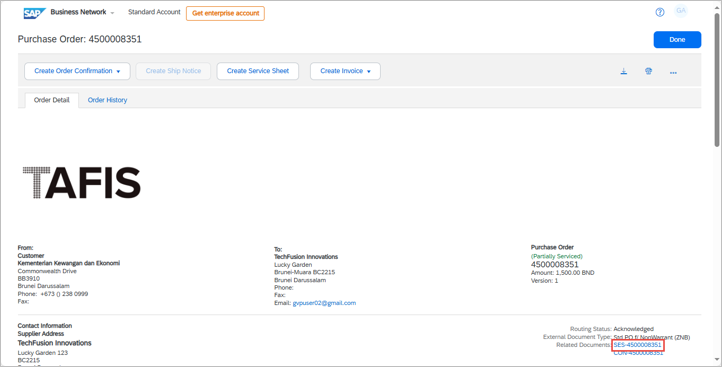
Figure 1
- Click on More Options button, then click on Cancel button. This would result
in pop-up to confirm the SES cancellation. Refer to figure 2.
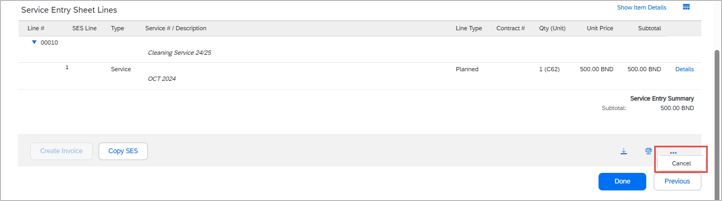
Figure 2
- Click on Yes button. Refer to figure 3.
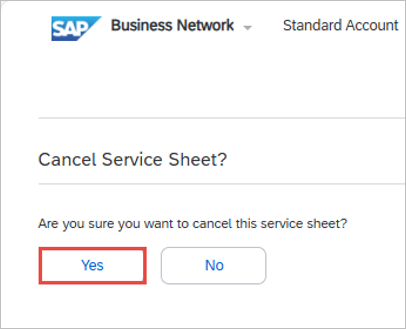
Figure 3
- Once SES has been cancelled, a new SES can be submitted by the Vendor.

Figure 4
- Vendor can select the line items in 'Create Invoice' page in GVP by clicking on the Toggle button under Include column at Invoice Lines section. This allows Vendor to submit separate or multiple invoices depending on the service completion and materials delivered.
- Toggle button is used to select (include) and deselect (exclude) services or line items for the service sheet.
- Toggle button is used to select (include) and deselect (exclude) line items for the invoice.
- Prior to submission, Vendor must confirm the correct line item or services are selected along with the subtotal amount. Refer to Figure 2.
- Colour of toggle button can be used as quick reference whether the line item is selected or deselected. i.e. Blue Toggle button means included for invoice while Greyed out Toggle button means excluded for invoice. Refer to Figure 1.
- As a gentle reminder, for Vendor to attach the correct company invoice softcopy prior to GVP invoice submission. Refer to Figure 2.
- Prior to submission, Vendor must confirm the correct line items are selected along with the subtotal amount. Refer to Figure 3.

Figure 1
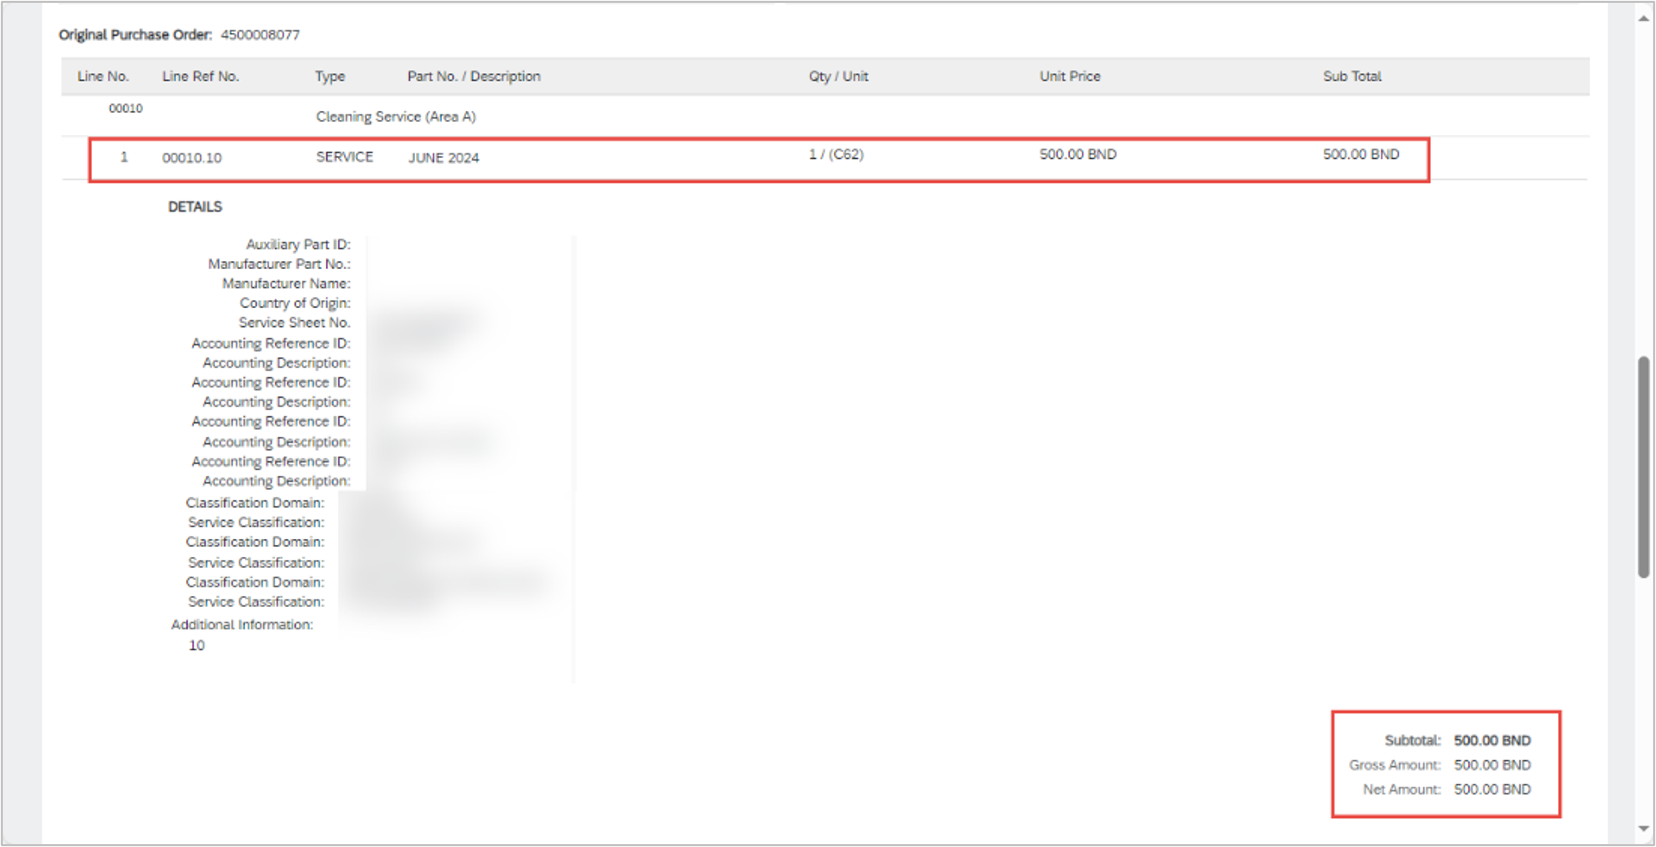
Figure 2
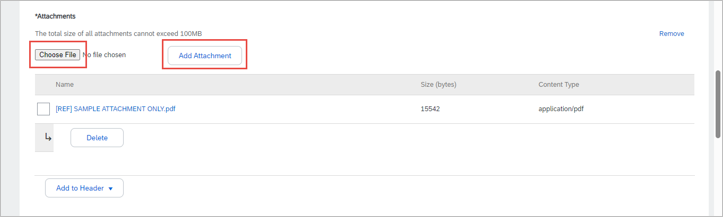
Figure 3
- Login to GVP (supplier.ariba.com) with their existing account.
- Find and open the Purchase Order (PO).
- Click on Create Invoice button.
- Prior to Invoice submission, Vendor must ensure the following criteria are
met:
- Ensure the respective Department performed Service Entry Sheet (SES) acceptance via transaction code ML81N in TAFIS 2.0 departmental platform (SAP GUI). It means the Department has acknowledged that the Vendor had successfully completed the service.
- Upload softcopy of company or business invoice that is stamped and signed by respective Department.
- Upload softcopy of any other relevant requested documentation that are stamped and signed by respective Department such as delivery order, service list, bill of quantity or award letter.
- For Invoice Number field, Vendor must follow the correct format:
- Original Vendor Invoice Number should be filled in.
- Do not include Symbols in the Invoice Number (E.g: #, $, *)
- No gaps or spaces between the alphanumeric characters of Invoice Number.
- The Invoice Number should only be limited to 16 characters only.
- Ensure correct line-items are selected or deselected according to the purpose of invoice claim.
- Click on Next button.
- Click on Submit button.
- PO status would change to either 'Invoiced' or 'Partially Invoiced'.
- Once the Vendor's payment has been processed and paid, the Invoice can be opened and its' status will change from 'Sent' to 'Paid'. Vendor may check their bank account to confirm the payment is received.
- Login to GVP (supplier.ariba.com) with their existing account.
- Find and open the Purchase Order (PO).
- Click on Create Invoice button.
- Prior to Invoice submission, Vendor must ensure the following criteria are
met:
- Ensure the respective Department performed Goods Received (GR) via transaction code MIGO in TAFIS 2.0 departmental platform (SAP GUI). It means the Department has acknowledged that the Vendor had successfully delivered the goods.
- Upload softcopy of company or business invoice that is stamped and signed by respective Department.
- Upload softcopy of any other relevant requested documentation that are stamped and signed by respective Department such as delivery order, service list, bill of quantity or award letter.
- For Invoice Number field, Vendor must follow the correct format:
- Original Vendor Invoice Number should be filled in.
- Do not include Symbols in the Invoice Number (E.g: #, $, *)
- No gaps or spaces between the alphanumeric characters of Invoice Number.
- The Invoice Number should only be limited to 16 characters only.
- Ensure correct line-items are selected or deselected according to the purpose of invoice claim.
- Click on Next button.
- Click on Submit button.
- PO status would change to either 'Invoiced' or 'Partially Invoiced'.
- Once the Vendor's payment has been processed and paid, the Invoice can be opened and its' status will change from 'Sent' to 'Paid'. Vendor may check their bank account to confirm the payment is received.
- This applies to invoices for lump sum Purchase Orders (PO), where the Quantity is replaced by the Amount (Unit Price) according to the department.
- Vendor can only claim partial invoice for lump sum PO if the value under Quantity column is previously adjusted during Vendor's submission of Service Sheet or Service Entry Sheet (SES).
- For Vendor's reference:
- Partial SES, refer to figure 1.
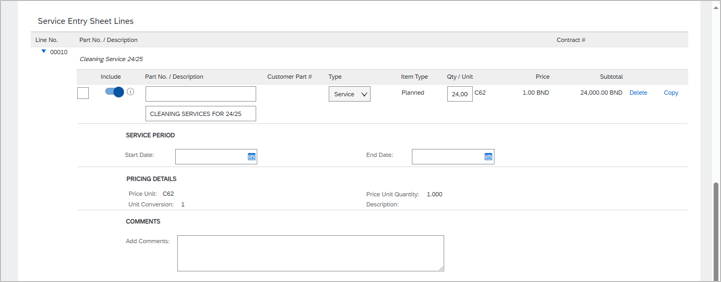
Figure 1
- Partial Invoice of lump sum PO based on the SES, refer to figure 2.

Figure 2
- Partial SES, refer to figure 1.
- The steps to perform Partial Invoice (partial claim) for lump sum PO is the same as the complete or whole Invoice submission process.
- This applies for the following scenarios:
- Invoice submitted with incorrect details such as incorrect quantity, selection of line items, amount, attachment and Purchase Order (PO) type.
- PO is to be closed for respective reasons.
- Department deleted the submitted Invoice and requires Vendor to submit a new Invoice.
- Login to GVP (supplier.ariba.com) with their existing account.
- Find and open the PO.
- Click on the Invoice document under Related Document. Refer to figure 1.
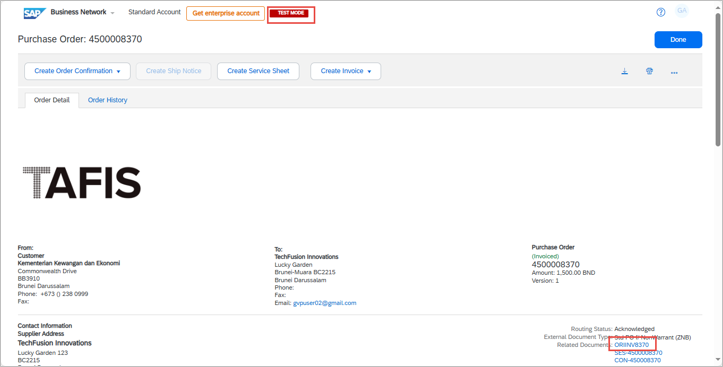
Figure 1
- Click on Cancel button. This would result in pop-up to confirm the invoice
cancellation. Refer to figure 2.

Figure 2
- Click on Yes button. Refer to figure 3.
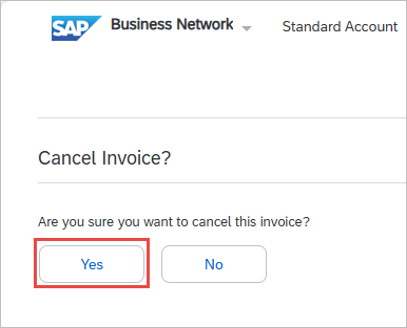
Figure 3
- The invoice is successfully cancelled. Refer to figure 4.